Review

Winecountry Camera Filter Holder & Blackstone ND Filters

Want to support my work?
Consider visiting the shop and buying "Absolutely Nothing"
https://www.TheUpperLeftUSA.com/shop/absolutely-nothing

or

Become a Patron!
https://www.patreon.com/HaiHoangTran


When I sold the majority of my Nikon gear, I sold my filter system along with it and I have to admit, I’ve been missing being able to do really long exposures. That’s why I recently purchased this Winecountry Camera filter system.

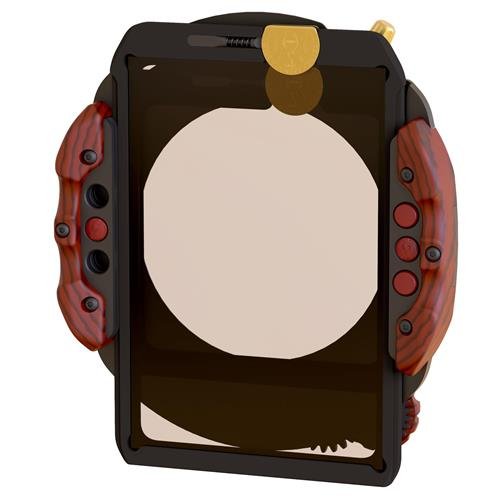
At the heart of the Winecountry Camera filter system is the filter holder itself. This was the main reason for me choosing this system over the others in the market.

The system consists of three main components, the lens adapter ring, the filter holder what Wine Country Camera calls a filter vault.

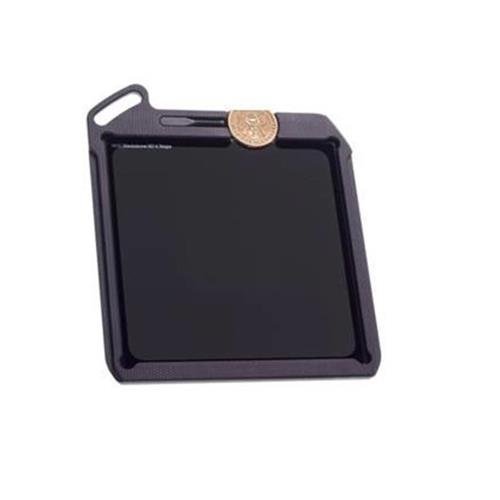
The filter vaults are used to house square filters. The vaults are made from a high density glass epoxy material that’s approximately half the weight of aluminum but more capable of abrasion resistance, friction, impact, corrosion and material fatigue. These vaults help to provide protection for the filters and help prevent filter breakage. There are currently two vault sizes which accommodate 100x100mm square filters and 100x150mm rectangle filters.

Wine Country Camera also currently produce their own line of solid ND filters known as the Blackstone ND filters. The filters currently come in 3 densities, 3, 6, and 10 stop reductions. These ND filters are advertised to have color cast so slight that it is indistinguishable from having no filters at all. These filters were made from the highest quality optical glass and developed to be used with some of the highest resolution camera systems on the market to ensure that there is no loss in resolution.

The filter holder includes a dedicated recess built in to create a light-tight environment for the ND filters. Having the vault around the filters on all sides also helps to eliminate internal reflections that are caused by light entering from the edges of the filter. This ensures that you get the best possible results when using a filter.

This filter system utilizes a removable internal polarizer. The polarizer is mounted inside the body of the holder instead of on the outside like many other filter systems on the market. This eliminates possible reflections and vignetting that occurs when mounting the polarizer further away from the lens. The polarizer rotation is adjusted via the wood knob located on the back of the filter holder and allows for easy adjustment even when looking through the viewfinder. 

The filter holder allows you to hold three filters along with the aforementioned circular polarizer. The first slot closest to the camera is intended for use with a solid ND filter and the two other slots are for ND grads. I’m not currently using ND grads with this system so am using the outer slots more for stacking solid NDs when necessary. The holder features push buttons which allow you to adjust the filter vaults and make lining up ND grads much easier. Each filter stage is independently adjustable and there is a safety catch so that the filter doesn’t accidentally fall through and hit the ground.

The things mentioned earlier and all the attention to detail really added to the value of the Wine Country Camera filter system for me. Things like the ability to add and remove the filter system without disturbing framing, integrating various wood parts so users having an easier time handling the system in cold climates and manufacturing the parts in a way that increases the overall results. These wood handles were even carved away to reduce possible vignetting. 

This system is also very lightweight. A complete holder system with two vaults, polarizer and adapter ring weighs only 15 ounces so less than a pound.

I think that overall, this is a great filter system and really stands out from the crowd. The filter holder was a forethought and not just a means to hold filters that a manufacturer makes, like it seems to be for many other filter holder manufacturers. I don’t dread using this system and that’s where the value really comes in. I don’t mind bringing this system along on trips and actually look forward to using it. If you’re looking for a new filter holder or an entire filter system, I would highly recommend checking out what Wine Country Camera is offering.

If you're considering on buying any of these products, please support my work by using the links below.

Wine Country Camera Filter System
http://amzn.to/2r0w65D
Wine Country Camera Blackstone ND Filters
http://amzn.to/2Dry2Xq
Wine Country Camera Filter Vaults
http://amzn.to/2CUn9fG

Hẹn gặp lại.

Jobo CPE2 Plus | Is a Jobo worth it?

If you’re into home film development, you’ve probably heard of the name Jobo. For those that haven’t, this is one of the Jobo variations. This is my personal Jobo CPE2 Plus. 

C0117.jpg


For those new to film development, some developing process requires strict temperature management. By this I mean that the chemicals need to be held at a very specific temperature and this is where a machine like the Jobo comes in. 

s-l1600-2.jpg

There are many variations to the Jobo machine. Some are very manual and are essentially just rollers and require you to do all the work. Some are fully automatic. You just press a button and don’t have to worry about a thing. Most people are going to buy a machine that falls in the middle, like this CPE2 Plus. Machines like the CPE, CPA, and CPP essentially do two things, they allow you to keep your chemicals and tank at a certain temperature via a water bath and the machine agitate the tank for you at a predetermined speed. These two factors contribute to consistency because if you were to do these things  manually, human error can effect the final result.


This leads me to the topic of this post, is a Jobo worth it? Well, like most things in life, the answer isn’t so black and white or straight forward. The answer is pretty much yes and no. I want to share with you my experiences with using a Jobo and you can determine for yourself wether or not it’s worth it, if you are interested in picking one up.

In my opinion, you have to be developing a lot of film for a Jobo to be worth it. I picked my Jobo up from eBay for a little under $600. This machine was new old stock meaning that although it is old, it has never been used. As the name indicates, CPE2 is the second version. Current models are CPE3 and CPP3. The CPE line is generally smaller with slots for 4 chemical containers and graduated cylinders instead of 6 in the CPP. The CPP are intended for the larger drums, but you can get quite a bit done with the CPEs.

Newer machines can range from $1700 to 3800 give or take depending on whether or not you’re going to be using a Jobo Lift or not. The lift costs around $600 and further adds to the consistence trend of the machine. These prices are of course only for the machine. You still have to buy the proprietary tanks. The tanks also need magnets or cogs to be used with the machine. The point is, there is a lot of stuff to buy and it’s all pretty expensive. Like I said, you have to be developing a lot of film, really care about consistency in film developing or you have some money to blow for this machine to be worth it.

Screen Shot 2017-10-26 at 6.04.52 AM.png

At the end of the day, owning Jobo like this doesn’t make film development effortless. You are still attached to the process. You still have to pay attention to development times, switch chemicals and clean everything. This is not an automatic machine. Like I said, the only thing that this machine really does is keep temperatures steady and agitate your drum. When I consider things in this regard, it’s almost clear in my mind that a Jobo is not worth it. That is why I’ve made videos on my YouTube channel (YouTube.com/TheUpperLeftUSA) showing alternatives to this machine that gets you similar results. Don’t get me wrong, having a Jobo is nice, but it is a luxury and is kind of over the top. It is not necessary. Most people hand develop in a sink and they get good results. Don’t think that you absolutely need this. To me, this should be the last thing that a film shooter should pick up. Try manually processing for awhile and see what kind of results you can get. If you feel that you are getting mediocre results, maybe send a couple rolls in to get them professionally developed and compare to your results. Try other alternatives first.

Check out these two videos where I've shown cheaper alternatives to the Jobo that I've come up with.

If you're considering on buying any of these products, please support my work by using the links below.

Anova Culinary Sous Vide Precision Cooker WIFI + Bluetooth
http://amzn.to/2xROXyw
Anova Culinary Sous Vide Precision Cooker Bluetooth
http://amzn.to/2za0aMy
EVERIE Sous Vide Container 12 Quarts
http://amzn.to/2zvwtby
Unicolor C-41 Powder Developer Kit
http://amzn.to/2Ad0A4O
Ivation Foot Spa Massager
http://amzn.to/2xknBoA
Cibachrome Motorized Roller Base / other motorized roller bases


Want to support my work?
Consider visiting the shop and buying "Absolutely Nothing"
https://www.TheUpperLeftUSA.com/shop/absolutely-nothing

or

Become a Patron!
https://www.patreon.com/HaiHoangTran

Nikon 50mm f/1.8G vs Nikon 50mm f/1.8D

If you’re in the market for a cheap Nikon lens, then I’m sure you’ve considered between the Nikon 50mm f/1.8D and Nikon 50mm f/1.8G. These are the two cheapest full frame primes lenses that Nikon currently produce. The 50mm f/1.8D retails for $134.95 and 50mm f/1.8G retails for $219.95. So, what makes the 1.8G cost $85 more and is it worth it?

First, let’s look at the size. In terms of specs, they are very similar in both size and weight and are definitely among the smallest lenses in terms of the Nikon lens lineup. When I was considering one or the other, I didn’t really care about the weight because they are too close to really tell when the lenses are held in hand. I also didn’t really care about the width either. The only thing that I cared about in terms of size was the length of the lens because I was looking for a small all-purpose travel lens. The specs indicate that the 1.8G is only .6 of an inch longer but when you see them side by side, that .6 of an inch is a lot more than you would expect. So in terms of size and weight, the 1.8D is the clear winner. 

A lot of the 1.8G’s size is attributed to the fact that it has the Nikon AF-S or Silent Wave Motor built in. 

This leads me to my next point, autofocus noise. The AF-S in the 1.8G allows it to autofocus much more quietly than the 1.8D. Realistically, if you were outside and there is background noise from the city, no one’s going to be able to hear either lens, but if you were in a quiet environment, the autofocus in Nikon D lenses stick out like a sore thumb. 

One thing worth mentioning is the fact that the AF-S will be a major determiner for many people. Because the 1.8D does not have a focusing motor built into the lens, many of the cheaper bodies will not be able to autofocus with this lens. Make sure that your camera body has an internal focusing motor or it will not be able to autofocus with this lens. You can tell if your body has this feature or not by the screw drive on the lens mount. It corresponds with this female screw on the lens and turns it to autofocus.  

One thing that I really like about Nikon G lenses is that they have autofocus with manual override. This means that even when you are in autofocus mode on the lens and you turn the focusing ring, the lens will allow you to manually focus. On D lenses, if the camera body is switched to autofocus and you turn the focusing ring, there is resistance on the ring. You can still turn the ring and force the camera to manually focus, but it just doesn’t seem like it’s good for the lens or the body. 

Lastly, let’s talk about image quality. Here are various sample images taken from each lens for you to determine for yourself which you like better. All images are unedited raw files converted to jpeg and taken with the Nikon D810. These images are by no means meant to be award winning but just taken at various apertures to show what the lens can possibly produce.


Honestly, I think that images quality is a toss up between these two lenses. They are very similar and if I had to do a blind test to determine which picture came from which lens, it’ll probably be a 50/50 guess. One thing that I would say is that the 1.8G does seem to transmit about 1/3 of a stop more light, but that can very well have just been a variation in one of these lenses and another copy of either lens could transmit more or less light.

After everything that I’ve talked about, if I were to go back and buy one of these lenses again, I would go for the 1.8D. I will say that I like the 1.8G better because it is quieter and I like the option to have the manual focus override, but the price difference just does not justify the purchase to me. When I bought these lenses, I got the 1.8G for $174 new. I’ve seen he 1.8D go for $90 new quite often but I actually purchased mine used from Offerup for $60 and it is in near mint condition, no scratches and functions perfectly. I just think that the 1.8D offers much more value for the money and if it is compatible with your camera, I would recommend you save some money and pick it up rather than the 1.8G.

If you're considering on buying one of these lenses, please support my work by using the links below.

Nikon 50mm f/1.8G
http://amzn.to/2wRCae4
Nikon 50mm f/1.8D
http://amzn.to/2wRHSN6


Want to support my work?
Consider visiting the shop and buying "Absolutely Nothing"
https://www.TheUpperLeftUSA.com/shop/absolutely-nothing

or

Become a Patron!
https://www.patreon.com/HaiHoangTran

Sony Sonnar T* FE 55mm f/1.8 ZA Lens

The Sony 55mm f/1.8 lens has to undoubtedly be the most underrated Sony E-mount lens in my collection. If I remember correctly, this was actually the first lens that I purchased when I got into the Sony system. I bought it, very shortly after bought the Sony 28mm f/2, and then the 55mm f/1.8 was put into storage for the last two years. 

I didn't put the 55mm f/1.8 away because it was lacking in any sense. This is quite possibly the sharpest Sony lens that I own. It definitely is if you consider DxOMark standards. According to DxOMark, the Sony 55mm f/1.8 is currently the third sharpest lens in the Sony lens lineup (https://www.dxomark.com/lenses/brand-sony/mounted_on-Sony_A7R_II-1035/launched-between-1987-and-2016/mount_type-Sony_FE/focal-from-1-to-1500/aperture_max-from-0.95-to-45/launch_price-from-0-to-13000-usd/sensor_brand-Sony#hideAdvancedOptions=false&viewMode=list&yDataType=rankDxo).

I orginally put the 55mm f/1.8 into storage because I was at a point in my photography career where I needed a wider prime, hence purchasing the 28mm f/2. 55mm was simply too narrow for my everyday work. I do a lot of photography in crowded locations and 55mm would mean getting a lot of tight headshots and that was just not what I was looking for. 

When I shoot film, I only use 50mm lenses. This isn't because I prefer the 50mm focal length, but simply because the lenses are cheap and it's the only focal length that I own for the Nikon F3. Because I was, in a sense, forced to use only 50mm lenses, I've gotten quite accustomed to them. Framing is predictable and results are repeatable. This made me want to try the Sony 55mm f/1.8 again, just to see if I enjoy it as much as with film.

To test the lens out, I decided to head to The Needle Lounge in Lakewood, Washington to get some tattoo photography. This has really come to be my standard for testing camera gear. To me, this setting provides me with more real world conditions than shooting test charts and still life. 

The shop is adequately lit but lighting is still difficult and not perfect. Usually when the artists tattoos, they have a light overhead to help light where they will actually tattoo. Because the light is so close to the tattoo and artist, it is extremely contrasty and sharp.  

One of the reasons to buy the 55mm f/1.8 is of the course the f/1.8 aspect of the lens. A large aperture to get that narrow depth of field. In this type of setting I wouldn't really shoot wide open because I want a bit more depth of field to get various aspects of the scene in focus, but did so just to change things up a bit. 

Looking at the pictures below, you can get a sense of how narrow the depth of field is at f/1.8. Focus is fading from one finger to the next. Where the focus is on the machine tip, the center of the Aztec calendar tattoo is already starting to be blurred because it's on the curve of the client's deltoid. 

One of my favorite things about using 55mm in general is that it is very close to the magnification of my eyes. This means that when I raise the camera to my eye, the image replication size is almost 1:1. This makes framing even easier than with a 50mm lens. 55mm is still a few mm short for my eyes but I think this is as close as I'm ever going to get. 

I also really enjoy the contrast and colors on this lens. Reviewers like to talk about the Zeiss "3D pop" and if there is such a thing, this lens has it. To me, the picture below is the perfect example of this pop. Just look at the client's face and the separation from everything else. It's as if there is that extra dimension that really makes the image pop. 

Overall, this is a pretty amazing lens in use. If you're looking for a standard focal length prime lens, I would highly recommend you check this one out. It is very sharp, capable, and well suited for really anything. It is currently mounted on my A7Rii and I feel like it's going to be on there for awhile as my main everyday walk around lens. 


If you're interested in this lens, please consider purchasing it by using the provided links.

Amazon - http://amzn.to/2s7mdTp


Want to support my work?
Consider visiting the shop and buying "Absolutely Nothing"
https://www.TheUpperLeftUSA.com/shop/absolutely-nothing

or

Become a Patron!
https://www.patreon.com/HaiHoangTran

$4550 Film Camera - Leica M7

I once saw on an online post something along the lines of “you don’t buy a Leica with your head, you buy a Leica with your heart”. I think that this is for most people very true because let’s admit it, for the price that you pay for just a new Leica body, you can get a professional body and lens from another manufacturer that is technically more capable in terms of specs. 

Buying a new Leica FILM camera is an even more insane notion today for some very obvious reasons, but there are still three Leica film cameras that are in production today. These cameras are the Leica M-A, MP and of course the M7. Each of the three options currently retail for $4550, body only. Again, completely insane especially considering that they are all film cameras with, relative for the price, little features.

So why would you buy a new film Leica or better yet, why did I buy a new Leica M7? Hopefully, by the end of this blog, both you and I will be able to justify the purchase, just a bit.

Considering that there are two other options from Leica, why did I buy the M7? To me, the M-A is pretty much a modern take on the M3, fully mechanical, no batteries required. This is great but there is no light meter. The MP is essentially an M6 at the end of the day when it comes to features. Sure it is “mechanical perfection”, but I’d rather get an M6 at half the price (which I did).

So, I’m left with the M7. To me, the M7 is the only camera in the Leica M film line that really stands out. It is the only film M camera that has any form of automatic exposure. For the sake of keeping things simple, let’s just say that the M7 has an aperture priority mode. Is this necessary? Of course not! I rarely ever use anything but the manual mode in any of my cameras because that’s just a habit that I’ve gotten into over the years. Auto exposure modes can be confining but if I’m going to be spending the same amount of money on a camera that can auto expose and one that can’t, I’m going to go with the one that can just to get a little bit more for my money.

With the M7 you also get up to 1/1000th second flash synch speeds when using Leica Metz flashes and an updated viewfinder. The M7 viewfinder displays your shutter speed, film speed, exposure mode, and flash readiness. The viewfinder information brightness is also automatically adjusted to match the ambient light conditions. 

The M7 can now automatically recognize the film speed, through DX film coding, and provides aperture priority autoexposure.

The M7 runs on two (batteries) but when those run out, you can still manually fire at 1/60th and 1/125th of a second.

That being said, because it is more electronically driven, the M7 is theoretically more prone to malfunctions. I’m not worried about this right now, but a few years down the line, this may be a problem. Especially if Leica decides to stop manufacturing the M7 or repairing it. 

Before deciding on the M7, I was actually going between it, the Contax G2 and the Konica Hexar RF. I like the Contax because it is the most advance rangefinder. If I’m not mistaken, it’s the only interchangeable lens rangefinder that has autofocus. I like the Hexar because when all things are considered, it is essentially a cheaper M7 but with better features, even though it was introduced years before the M7.  I personally feel that the Hexar is the closest in comparison to the M7, but unfortunately, it’s not an M7. It’s not a Leica and if you remember, you don’t buy a Leica with your head. 

Both the G2 and Hexar has automatic winding functions and more importantly to me, they have a maximum shutter speed of 1/4000th of a second. That’s two stops more than the M7. This is very appealing because on a bright sunny day, using ISO 100 film, we’re talking about a difference of using f/5.6 and f/2.8. The difference in depth of field could make or break a photo. If you want to use a fast lens on the M7, you’re going to either have to wait until there is less light or use an ND filter. Either way, it’s more complicated than it should be. 

One thing that I’m enjoying quite a bit on this M7 is the cloth shutter. IT IS QUIET. The M7 has possibly the quietest shutter I've ever heard. If you watch the above video, there are some sound clips of the shutter. There is just a quiet little click to indicate the firing of the shutter and I love that. Very inconspicuous. 

This may be trivial but I like that this camera actually has an on/off button, revolutionary right? Wheres on the M6 to turn the camera/metering off, you have to change the shutter to bulb mode. I have admit that I’ve forgotten about this feature before and just leave the M6 on. With the M7, it’s exactly the same on/off mechanism as the F3, except that when the red dot is showing, the camera is actually off, not on. When the camera is off, the electronics gets turned off and the camera mechanically blocks the shutter release to prevent accidental exposures.

It’s interesting to note that when the camera is in manual mode, you can fire the shutter immediately upon turning the camera on. If you’re in aperture priority, you actually have to wait approximately 2 seconds, or until the film speed display in the viewfinder goes out, before you can take a picture. This is a weird setting and can really slow you down sometimes. 

I find the ISO dial on the camera back door to be interesting. It’s a two in one dial. The dial doubles as both the film speed selector and the exposure compensation. If you want the camera to automatically set film speed, as in it reads the DX coding on the film catridge, you set it to DX mode. If you want to set a custom film speed, as in you bulk rolled, the cartridge doesn’t have DX coding, or you want to push or pull the film, just turn the dial to the desired film speed. The setting that you want is the one opposite to the white dot of the exposure compensation dial.

One thing that’s always bothered me about using Leicas is just how you hold them. If you’re shooting in landscape, everything is for the most part fine. The problem is in portrait orientation. Depending on how you hold the camera, the viewfinder is blocked and you can't see anything. I show in the above video how I would normally hold the camera and the problem with using rangefinders. The picture to the right is from the M7 manual and shows how you should hold the camera in portrait orientation. This seems extremely awkward as you wouldn't really be able to adjust anything on the lens if you hold it that way.

At the end of the day, the M7 is an amazing camera, but is it worth the $4550 price tag? Honestly, it’s not. This body will give you the same result as really any other film camera as they all really do the same thing. Sure some cameras may have more features than others, but at the end of the day, they’re just tools. A used $100 camera will do the same thing as this new $4550 camera. If you want a Leica for the lenses, why not just buy the lens and adapt it to a cheaper or more capable camera? The Hexar uses the same M mount.

Logically speaking, we don’t buy Leicas because they are the greatest cameras in the world. We buy Leicas for the heritage, the history, for the sense of owning a Leica and that’s ok. If you’re happy with a Leica and it gets you out shooting, then that’s all that really matters. 

If you want the M7 or any other Leica and you have the funds for it, then buy the Leica. Filing the Leica void with another camera isn’t going to do anything but leave you with regrets. 

If you're interested in this camera, please consider purchasing it by using the provided links.

Leica M7
Amazon -
http://amzn.to/2skSTog


Want to support my work?
Consider visiting the shop and buying "Absolutely Nothing"
https://www.TheUpperLeftUSA.com/shop/absolutely-nothing

or

Become a Patron!
https://www.patreon.com/HaiHoangTran