Review

Minimizing my Camera gear for Travel

Nothing is finalized yet, but it’s looking like I’ll be spending a good portion on my summer traveling abroad. This may be my most complicated trip in terms of logistics and when traveling, the thing that complicates my trips the most has to be my camera gear. I’m the type of person that likes to pack everything to make sure that I forget nothing. This just means that I bring a lot of stuff. This makes traveling complicated because before I even get to my destination, I have to worry about whether or not the gear will even successfully make it on the plane and inside the cabin. If you’ve haven’t seen it, in my Traveling by Plane with Camera Gear video, I talked about how camera gear and anything that you find valuable should be taken into the cabin as a carryon because unless you’re traveling with something like a Pelican case, there is a huge chance of the gear getting damaged. From my experience, the best way to get this done is to just travel with a bag that will blatantly fall within carryon size requirements and to travel light because many international airlines have a strict carryon weight requirement. Downsizing my gear of course also has the benefit of making my entire experience more enjoyable because I don’t have as much to carry around. With all of that in mind, I’m going to walk you through what I think will be the best minimal setup for me.

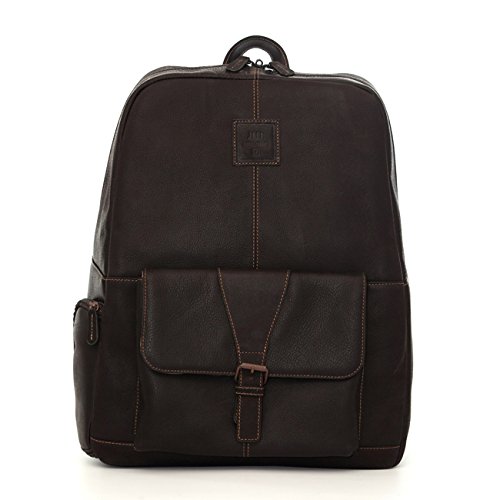
First let’s talk about the bag because that’s possibly the most important factor to all of this. The bag that I’ve decided on is the Jill-E Designs JACK Hemingway 15" Leather Backpack. This is a new bag for me but I saw the potential because it seems to be pretty well setup for travel even though it’s fairly simple and minimal. On the outside is one external pocket. This is pretty decently sized and I think it’ll be good for holding things like filters, batteries and small accessories like that. On the side of the bag is a zipper which leads to a stretch panel made for a water bottle but I’ll probably make this work with my travel tripod. Moving inside, the bag has a bunch of organization pockets for pens, electronic devices and the like. I chose this backpack because like I said earlier, it is blatantly smaller than any carryon size requirement. I’m certain that this bag will actually work as a personal item, which is another type of baggage that you’re typically allowed in the cabin. Again, watch that Traveling by Plane with Camera Gear video to learn more about this. So, if I’m able to efficiently use this bag, I’ll actually still be allotted a carryon luggage. This means that I’ll just be able to carry on my essentials in the carryon and maybe not need anything else besides the two bags.

My current plan is to use the Jill-E bag as my camera bag and I’ll be able to accomplish this with the various camera inserts that are available for this bag. I actually own two different inserts, the
Jill-E Designs Jack Backpack Insert and the Jill-E Designs E-Go Camera Insert. Right now, it’s looking like I’ll be bringing both of these along for my trip. The larger Backpack Insert will be used when I’m just traveling and have everything put away. The E-Go Camera Insert will be for short day trip use where I’m just carrying one body and one lens. The E-Go Camera Insert actually comes with its own carrying strap that turns the insert into an independent bag so if I really want to go minimal, this is an option. Again, if I’m able to carry all my camera gear in this bag, it’s going to make my life a lot easier when traveling and frees up my carryon.

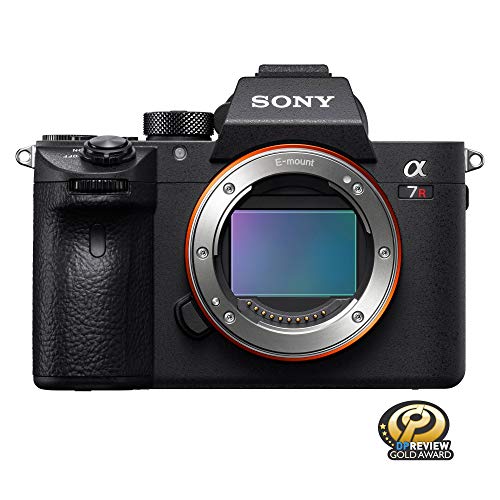
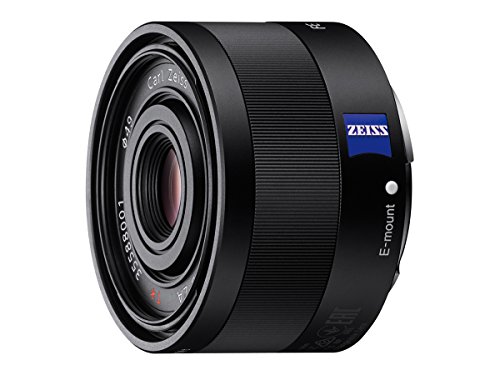
Now, let’s talk about the camera gear that I’ll be bringing. After some thought, I think that I’ll only be bringing one main camera setup and that’ll be the Sony A7RIII and the Sony 24-70mm f/2.8 GM. This is the setup that I most use on a day to day basis and the setup that I’m most used to. With this, I’m pretty much able to get anything done. I’ve actually traveled with a similar setup in the past and it was nice but definitely limiting. I shoot photos and videos and having only one camera really makes this difficult because I can only shoot photos or videos, not both at the same time. Sometimes, I like to get footage of myself doing photography. This is obviously not possible with only one camera. The only answer is to bring another camera, one for photos and one for videos. So, if I do bring another camera it will be the Sony A7RII and attached to that will be the Sony Vario-Tessar T* FE 16-35mm f/4 ZA OSS Lens. Finally, the tripod. A lot of my work involves the use of a tripod so it’s just something that I’ll have to bring. The one that I’ve decided to bring is the Benro FIF19CIB0. This is my current favorite travel tripod. It’s small, lightweight and extremely capable.

Like I said, the trip is not finalized yet. I don’t know when I’ll be leaving, where I’m going or which airline I’ll be flying with. That last factor is a major determiner for all of this. Different airlines have different regulations for luggages. The airline that I fly with will play a role in the gear that I bring.

All that being said, this is looking to be a travel heavy summer. There’s going to be a lot of new travel/photography content coming soon so make sure to check back for that!


If you're considering on buying any of the products mentioned, please support my work by using the links below.

Jill-E Designs JACK Hemingway 15" Leather Backpack https://amzn.to/2KlAoNQ

Jill-E Designs Jack Backpack Insert https://amzn.to/31DV3lk

Jill-E Designs E-Go Camera Insert https://amzn.to/2RiCte0

Sony A7RIII https://amzn.to/31ABpXE

Sony 24-70mm f/2.8 GM https://amzn.to/2IjKXPa

Sony A7RII https://amzn.to/2O35rwl

Sony Vario-Tessar T* FE 16-35mm f/4 ZA OSS Lens https://amzn.to/2JED5VG

Benro FIF19CIB0 https://amzn.to/2Idiw6x


Want to support my work?

Consider visiting the shop and buying "Absolutely Nothing"

https://www.TheUpperLeftUSA.com/shop/absolutely-nothing

or

Become a Patron!

https://www.patreon.com/HaiHoangTran

Vector Thunderbird Butane Double Torch Insert for Zippos

I’ve previously made a review for a butane insert that I bought for my Zippo lighters HERE . Although the insert that I bought works, it left me somewhat dissatisfied. I originally bought the butane insert to solve the problem of lighter fuel evaporation with the original Zippo insert and it does a great job at this. I can’t say if the insert has allowed for any evaporation of the fuel, but there is definitely a good bit in there. Definitely more than what the original Zippo insert would have, for sure. In terms of fuel storage, I’m completely satisfied. However, I do have another problem with Zippos and it’s with their claim of being “windproof”. Let’s be clear, Zippos are in no way windproof. They do fair very well in the wind, but not windproof. Another problem is that when it’s windy, the wind really does make it hard to use a Zippo as the flame is natural and dances around a bit. These problems are also present with the soft flame butane insert that I bought. So, what to do? The obvious next step was to try a torch flame style insert.

IMG_1279.jpg

I again bought a Vector Thunderbird branded butane insert because I was happy with the quality of the last one. This time, I picked up the double torch version. There are a few different torch designs to choose from but I decided on the double torch because to me, it’s the coolest. The double torch just looks insane (in a good way). However, one drawback of the double torch is the amount of fuel consumption. It’s not like you’ll instantly run out of fuel but more torches does equate to more fuel use, so just be aware of that. On the bottom of the insert is an adjuster that allows you to adjust the height of the flame. You can use this to make the flame smaller and use less fuel. You can also use this to make the flame a lot bigger and use even more fuel. This looks pretty cool, but is definitely not recommended for long term use unless you have a limitless supply of butane fuel.

So, how does this new insert fair in the wind? I would have to say that this is as close to perfect as we’ll probably get. The torch is so strong that wind hardly has any effect on it. This has made getting a flame in windy conditions so much easier and I’m not sure if I can go back to a normal soft flame after trying this out.

IMG_1261.jpg

Another benefit of this insert to the soft flame insert is that with this one, you can have the lid of a Zippo open without having butane leak from the insert. With the soft flame insert, once the cam is flipped to the open position, gas begins to leak in preparation for use. You have to make sure to keep the Zippo lid closed when not in use or shut the cam when you want to keep the lid open. With the double torch insert, there is no such requirement. The lid can be open for as long as you want without any additional butane leakage.

So far, I’ve been very happy with this insert and if I needed another butane insert, I’ll probably pick this one up again. This butane insert comes highly recommended.


If you're considering on buying any of the products mentioned, please support my work by using the links below.

Vector Thunderbird Butane Double Torch Insert: https://amzn.to/2G0qSLo
Other Zippo Butane Inserts: https://amzn.to/2U3pPzj
Zippo Lighters: https://amzn.to/2VyPIZb


Want to support my work?
Consider visiting the shop and buying "Absolutely Nothing"
https://www.TheUpperLeftUSA.com/shop/absolutely-nothing

or

Become a Patron!
https://www.patreon.com/HaiHoangTran

Pelican 1510 vs SKB iSeries 2011-7


If you're considering on buying any of the products mentioned, please support my work by using the links below.

Pelican 1510 https://amzn.to/2EN2353

SKB 3I-2011-7 https://amzn.to/2UsRyKH


Want to support my work?
Consider visiting the shop and buying "Absolutely Nothing"
https://www.TheUpperLeftUSA.com/shop/absolutely-nothing

or

Become a Patron!
https://www.patreon.com/HaiHoangTran

Rokinon / Samyang 35mm f/2.8 AF for Sony E


My main, every day use lens for the past few years has been the Sony 24-70mm f/2.8 GM. This lens is on my camera body 99% of the time and is my go to for a one body and one lens setup. That being said, it is still relatively large and there are times that I don’t want to carry it around. For a paid job? No problem. I’ll deal with the size and weight all day, if I was making some money. But sometimes when I’m just walking around and want to bring a camera along with no pressure to take any photos, this can be a hassle. So, I’ve been in the market for a smaller and lighter weight lens. That’s why I picked up the Samyang 35mm f/2.8 autofocus lens for the Sony E-mount.

I’ve been using this lens for a few weeks now and want to share with you some of my thoughts as well as some samples from the various occasions that I’ve had the chance to use this lens. I just want to make it clear that this is not a pixel peeping review. I did not shoot test charts or go out and purposely try to find imperfections like chromatic aberration or distortion with this lens. I just shot it how I normally would and if I noticed something, I’ll mention it. Remember, the things that I say are my personal opinions and are based on how I used this lens. Your mileage may vary.

It should be noted that there is both a Rokinon and Samyang version of this lens. These are essentially the same company that produces some of the same lenses. I personally bought the Samyang version because it’s typically cheaper, but if you’re interested in the Rokinon version, just know that it is the same as the lens that I’m reviewing.


Construction

Although retail price for this lens is $399, it regularly sells for around $250. Let’s face it, just based on the price, you shouldn’t really be expecting amazing construction quality or premium build materials. This lens is made out of plastic and there is really no questioning of that. To be honest, the first time that I picked this lens up from the case, I thought to myself that “Man, this feels like crap.” You can tell right away that it’s made out of plastic and it’s not like one of those things that are made out of plastic but the manufacturer finished it in a way that the surface is kind of cold and feels like metal. No, this feels as plastic as plastic can feel. But again, for the price this is kind of expected.

One thing that I do want to mention with this lens is the hood. I actually really like the design of the hood in concept. How well it works? I can’t say considering that it’s so small, but it looks good and is a great cosmetic design. My problem with the hood however, is its fitment. It is very lightly held in place and takes little to no effort for it to come off. Just the slightest bump and it could possibly fall off. I feel that through my normal use of the lens, I constantly have to re-tighten the hood because I see it unscrewing after almost every shot. I’m actually thinking of just adding some tape between the hood and lens just to make the fitment tighter. Hopefully, this will help.

Again, this is a lens that regularly sells for around $250. Don’t expect the world of it. However, if you purchase it with reasonable expectations, I think you’ll be quite satisfied because the cheaper materials do make this lens very light. Sitting at 85.6 grams, this is without a doubt the lightest lens that I’ve ever held in my hands (that actually performs well). It feels like I just have the lens cap on the body and that’s great for what I was looking for, a small, compact and lightweight lens. A complete winner in that sense.


AutoFocus

Considering that this is a third party autofocus lens for Sony E-mount, you’re probably wondering how well the autofocus performs. Again, I didn’t do any scientific tests so what I’m about to say is strictly an opinion. That being said, I’m completely satisfied with AF performance because it gets the job done and that’s about it. For the most part, it just works. 

Samyang 35mm f/2.8 AF Photo Mode AutoFocus

Samyang 35mm f/2.8 AF Video Mode AutoFocus

In testing this lens, I took it to The Needle Lounge, a tattoo shop in Lakewood, WA to take some environmental portraitures of the artists at work. I wanted to specifically mention this shoot because one thing that I noticed during this shoot was this lens’ issue with eye autofocus and the fact that it was nonexistent. I could not get eye AF to work with this lens and my Sony A7RIII. Face detection worked but Eye AF just did not activate no matter how the subject was situated, facing straight towards the camera or slightly turned. Because of this, I spent the majority of the shoot manually focusing on the eyes and that gave me good results. When I got home, I did some quick internet searches and found that this lens could indeed use Eye AF. So, I went back to The Needle Lounge to specifically test for the Eye AF functionality. The second time around, Eye AF detected the eye without a problem, even when the head was turned at an extreme angle. So at this point, I don’t know what to say about Eye AF. Is it available? Yes, but from experience, I do have my reservations about it.

Samyang 35mm f/2.8 AF Eye Autofocus

Something that I do want to bring up with the autofocus of this lens is the noise that it makes because that can be audible in specific situations. The first time that I mounted this lens, I had my A7RIII in AF-S, so the camera only attempts to acquire focus on a single subject per AF activation. When I did this, I noticed a noise coming from the lens. Turning the camera around and looking at the lens when activating autofocus shows that this lens opens the aperture wide open when autofocusing and closes back it down when focus is acquire. This opening and closing of the aperture is where the noise that I noticed was coming from. This is only something that you notice when you have the aperture at anything other than wide open because if you’re at f/2.8, the lens won’t have to open the aperture because it’s as open as possible with this lens. 

Another situation where I’ve noticed the AF noise is when the camera is using AF-C or continuous autofocus in video. If you’re using these setting, you can hear the autofocus motor in the lens continuously moving. I personally don’t think that this is a problem because I can’t hear the noise when the camera is more than a foot away, even in a really quiet room. You really have to be right on the lens to hear it but if for some reason you have a mic directly on the lens, the mic may pick up the noises up.


Image Quality

4K Video Sample with the Samyang 35mm f/2.8 AF

Finally, let’s look at some image samples taken from this lens. Again, I’m not much of a pixel peeper but I will say that I did notice the sharpness of this lens. For something so cheap, I’m quite surprised at how well this lens performs in terms of sharpness. I can easily make out the details on the artist and fine details like the individual lines of a tattoo.

The bokeh from this lens is also quite nice. For a 35mm f/2.8 lens, you can get some pretty decent background blur, but this is not in comparison to any other lens. We are only looking at this lens independently and I personally believe that the bokeh is quite nice considering the specs of this lens.


Conclusion

At the end of the day, this a cheap lens that regularly sells for $250. With that in mind, I think that this lens provides such great value and performs above and beyond everything that I expected. Not only does it provide me with the small and compact lens that I wanted, but it does it with surprisingly good results.

If you’re interested in this lens, then I’m sure that you know about it’s Sony counterpart, the Sony Sonnar T* FE 35mm f/2.8 ZA Lens. This is the original E mount compact lens from which we can probably assume Samyang got its inspiration from. I’ve seen some reviews comparing the Samyang vs. Sony lens and although most comparisons will say that the Sony has a slight optical and build advantage, you have to ask yourself if it is worth paying more than 3 times the price? For me, it is not. I originally wanted the Samyang as a backup to my Sony 24-70mm GM. I don’t expect to be using this type of lens that often, so there is really no point in investing in the Sony 35mm. I’m perfectly happy with what the Samyang provides me, especially for the price.

If you’re interested in a small, lightweight and compact lens that autofocuses for the Sony E mount system, then I can’t recommend the Samyang 35mm f/2.8 AF enough. Pick one up and try it out for yourself. I think that you’ll be surprised at what this little lens can do.


Affiliate Links

Samyang 35mm f/2.8 AF FE Lens for Sony E https://amzn.to/2t5IBen

Rokinon 35mm f/2.8 AF https://amzn.to/2DcjOd6

Sony Sonnar T* FE 35mm f/2.8 ZA https://amzn.to/2SukjZL


Want to support my work?
Consider visiting the shop and buying "Absolutely Nothing"
https://www.HaiHoangTran.com/shop/absolutely-nothing

or

Become a Patron!
https://www.patreon.com/HaiHoangTran