Review

Vemico 3rd Party Camera Batteries

It’s outrageous what original manufacturers charge for their branded batteries. This is why I’m a big proponent of 3rd party camera batteries and why I’ve always purchased them for my personal cameras. When a rep. for Vemico reached out to me for a possible review, I jumped on the opportunity because you can never have too many spares (especially if you use older Sony mirrorless cameras).

I currently use two types of Sony batteries, the NP-FW50 and the NP-FZ100. The NP-FW50 currently costs $49.99 each and the NP-FZ100 costs $78 each at the time of this post. My first Sony camera was the A7RII. One complaint often made about this camera is that it has poor battery life. This is simply because the NP-FW50 battery that it uses is small and the A7RII uses a lot of power. I currently own 7 NP-FW50 batteries and EASILY go through 4 batteries on a full day’s work. The A7RIII improved on battery life with its larger NP-FZ100 battery and I currently own 2 of them. I’ve been able to shoot an entire wedding with one battery with some intermittent charging during down time in between events. This larger battery is greatly appreciated but it comes at a cost. $78 per battery is a bit steep, which is why I only own 2.

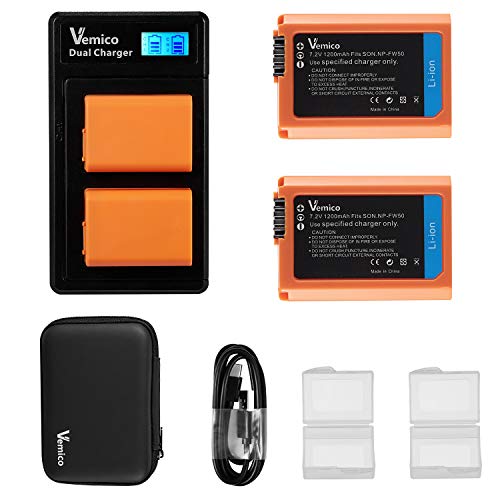
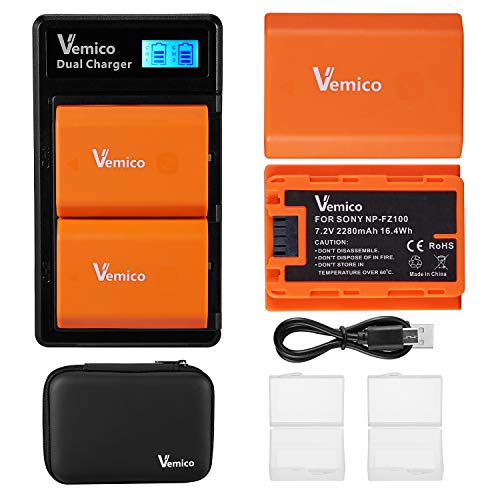
This is where the Vemico batteries come in. The Vemico NP-FW50 battery set currently sells for $31.99 for TWO batteries, two battery cases, a dual battery charger, a UBS-C cable and a carrying case that holds everything. The Vemico NP-FZ100 battery set comes in a similar package and costs $52.99. Compared to OEM, the Vemico options are an absolute steal EVEN IF we were getting just the batteries, which we’re not. Even compared to other 3rd party battery manufacturers, Vemico’s prices are still very competitive if not better.

Over the years, I’ve tried quite a few batteries from different 3rd party manufacturers. Although they’ve all worked, I’ve never been overly satisfied. I’ve never done any scientific testing, but I’ve always felt that the OEM batteries were better or have more of a charge. One thing to note about 3rd party batteries is that they very often will advertise a very high mAh capacity, higher than that of the OEM battery. This is great, but it’s often just false advertising and the batteries drain pretty quick. Again, I haven’t done any testing but this is how I feel after years of experience with my batteries. Even so, it is still cheaper to buy multiple 3rd party batteries than one OEM battery. You can buy more than enough 3rd party batteries to compensate for the difference in battery capacity.

The quick drain was something that I was also expecting with the Vemico batteries. I can’t vouch for their long term use as I’ve only been using them for a week, but from my initial uses, I can tell that these batteries work much better than the other 3rd party brands that I’ve tried. During usage, they seem to last much longer and the battery percentage indicator doesn’t drop as quick.

One thing that I’ve found interesting about the Vemico batteries is their ability to hold a charge when the camera is off. If you didn’t know, many Sony cameras continually draw power even when the camera isn’t on. This is frustrating because you can leave a fully charged battery in the camera for a few hours only to come back to a few percentage gone. This does not seem to be as big of a problem with the Vemico batteries. I’m currently typing this post about 7 hours after shooting 20 minutes worth of 4K video and the battery STILL shows 100%. This is great. Even with my OEM batteries, there is no doubt that the indicator would’ve dropped at least a few percent. *UPDATE* Over 24 hours later and the battery indicator still shows 100%.

IMG_1728.jpg

Another thing that I like quite a bit about these Vemico batteries is the overall presentation. Everything comes in a nice carrying case. Open up the case and you get more cases to hold the batteries. In the case of the NP-FW50 package, you even get precut foam to hold everything in place. The NP-FZ100 set didn’t come with the foam and this is likely because it’s a newer battery and Vemico reuses the same parts throughout there battery line and just didn’t have the foam for it. Either way, the carrying case and battery cases are a nice touch.

The included double battery charger is also appreciated. This is something that you typically have to purchase separately and costs around $10. I have way too many batteries to be using a single battery charger so this is a must! However, the one included is nothing new. I actually have one that’s very similar because these are mass produced chargers that manufacturers buy and slap their logos on. What’s different with this one is the USB-C interface. The charger that I already have uses a micro USB interface. Having USB-C here is a pain because it’s another cord to carry from what I already do for the other chargers but it’s nice to know that this interface will be future proof for awhile.

Overall, I’m pretty happy with these Vemico 3rd party batteries. I’ve been consistently using them and enjoy them as much as I can enjoy batteries. If you’re looking for a cheaper alternative to OEM batteries for your cameras, check out the options from Vemico.


If you're considering on buying any of the products mentioned, please support my work by using the links below.

Vemico Storefront https://amzn.to/2ZNG2eL

Vemico NP-FZ100 Battery Charger Set https://amzn.to/2PIX3qT

Vemico NP-FW50 Battery Charger Set https://amzn.to/2NLA9wa


Want to support my work?

Consider visiting the shop and buying "Absolutely Nothing"
https://www.HaiHoangTran.com/shop/absolutely-nothing

or

Become a Patron!
https://www.patreon.com/HaiHoangTran

or

PayPal
https://www.PayPal.me/HaiHoangTran

HOHEM iSteady Mobile+

A representative of HOHEM recently contacted me to see if I was interested in trying out their new smartphone gimbal, the iSteady Mobile+. At this point, I own and have tested quite of few gimbals and to be honest, I’m kind of tired of them. Unless something crazy comes out, I just kind of pass on them. Nevertheless, I wanted to see what this product was all about so I headed to the company’s official website. Then, I saw it. A fully featured smartphone gimbal that only costs $89. This would definitely be the cheapest gimbal that I ever tried so I wondered if it was any good. I told the rep to send it over and here it is, the HOHEM iSteady Mobile+.

IMG_1724.JPG

First, let’s take a look at the design of this product. It’s pretty straight forward and looks like many other smartphone gimbals. It’s fairly small and only slightly larger than my hand. This is nice because to me, the whole point of using a phone camera is because of the size and convenience. I want to impede this as little as possible so if I were to use a phone gimbal, it has to be as small as possible.

On the handle we get the gimbal’s controls. A controller wheel to adjust the gimbal’s parameters. A toggle switch which allows for focus and zoom adjustments. A button to toggle between the various gimbal modes. A button to start/stop recording and to take photos. A trigger to activate some more of the gimbal’s features (we’ll get to that in a moment).

Using the mode selector button on the front of the gimbal, we can toggle between 4 of the gimbal’s modes. With this, we can toggle between PF (pan follow), PTF (pan/tilt follow), AL (all lock), and AF (all follow).

IMG_1725.JPG

The trigger on the back allows for a few other uses. Holding it down, we get Sport Mode which increases power to the motors and allows it to react more quickly. This could be useful if you’re trying to follow a fast subject or you can use this feature to create in camera transitions like whip pans. Double tapping the trigger re-centers the motors to its initial position.

As with any modern gimbal that wants to stay in the loop, this gimbal also features inception mode and the ability to shoot in vertical orientation.

What surprises me about this gimbal is its inclusion of face/object tracking. Don’t get me wrong, this is not a new feature, but to see it in a product at this price is really appreciated. I actually like this feature quite a bit. I’ve tried vlogging with a phone in the past but have always found it difficult because I like to record with the rear cameras. I use an iPhone and none of them are currently able to shoot 4K video with the front facing camera. I only produce in 4K so using the front facing camera just doesn’t work for me. I’m used flipping the camera around to get 4k footage but the problem with the iPhone is that framing is a bit difficult when you do this. It’s not just holding the camera out like other cameras, but because of the way that the cameras are laid out, you have to kind of angle the phone a bit and there can be a learning curve to this. But with the iSteady Mobile+’s face detection, all I have to do is flip the gimbal around and it automatically centers me in the frame.

IMG_0033.JPG

Now, this gimbal is by no means perfect. In my short time with it, I’ve noticed some annoyances. First, this is really a gimbal for smaller smartphones, say an iPhone XS not a XS Max. The gimbal cannot balance a larger phone and falls to the left. The adjustment arm just doesn’t move to the right far enough. Another indication that this gimbal is really not for larger phones is the audio ques that you get when the gimbal is pushed. The motors will get really worked up and become very audible, even when you set them to maximum strength in the settings. Although I can still use my XS Max with this gimbal, it can be a struggle with certain modes as the gimbal tries to keep up with the weight.

Another issue that I have with this gimbal is the way that it pans. This kind of goes in hand with trying to do selfies with the rear camera. Many other gimbals have a way to activate selfie mode and the gimbal will actually spin the phone around. The iSteady Mobile+ does not. You have to manually do this one way or another. You would think that you just turn the gimbal around but the pan axis does something weird where it often gets caught somewhere in between and you’ll have to deal with it. If you need to do this, you’ll just have to play with the gimbal and figure out what works best for you. I sometimes use Sport Mode to make the pan axis move faster and trick itself into spinning around or I just hold the vertical bar and force it around. Either way, this is just a waste of time. HOHEM needs to add a selfie mode into the firmware.

IMG_1721.jpg

Finally, I think there is some work that needs to be done in the app. Right now, it’s just not very intuitive to me and I often find myself searching for features or trying to figure out how to do things. The menu and icons can be set up better. I also have a problem with just how small and close everything is. Just look at the icons for subject tracking and the focus/zoom selector (bottom left). They’re so small and when I try to activate these features, I find myself touching the bare screen and the app thinks that I’m trying to adjust exposure. This happens so often and just slows everything down. On the bright side, both this and the panning can realistically be fixed in firmware and I really hope that the people at HOHEM takes note and adjust these things.

This flap never stays in place

This flap never stays in place

To be honest, as a gimbal the HOHEM iSteady Mobile+ is nothing special. It doesn’t revolutionize the gimbal industry and really doesn’t give you anything different. The modes that the iSteady Mobile+ offers are pretty standard. They are the ones that pretty much every other gimbal provides. That’s not to say that that is a bad thing because these are the modes that you will most likely use. The inclusion of face/object tracking and vertical shooting is nice, but again, pretty standard nowadays. This makes the iSteady Mobile+ fall into the crowd and it is a big crowd when you have companies like DJI, Zhiyun and FeiyuTech dominating the market in every sector. But, what those other companies don’t have is a gimbal that has all the standard features and only costs $89.

If you were to ask me for a gimbal recommendation, I would typically reply by saying to research and see which one has the features that you want, but to also consider buying the cheapest option because all modern gimbals essentially do the same thing. In use, they all essentially run off the same modes. What you are really paying for are the minor features beyond using the gimbal for stabilized footage. You’re paying for the ability to add accessories, to fold down to a compact size, to be able to lock the various axis to make travel and balancing easier, and etc. But if you don’t need or want those things, you just want a cheap gimbal so you can go out and shoot video without getting shaky footage, then something like the iSteady Mobile+ is the gimbal for you.


If you're considering on buying any of the products mentioned, please support my work by using the links below.

HOHEM HOHEM iSteady Mobile+ https://amzn.to/2L9TGFb


Want to support my work?

Consider visiting the shop and buying "Absolutely Nothing"
https://www.HaiHoangTran.com/shop/absolutely-nothing

or

Become a Patron!
https://www.patreon.com/HaiHoangTran

or

PayPal
https://www.PayPal.me/HaiHoangTran

Tyger Auto TG-AM2T20048 Textured Black Side Step Rails Nerf Bars Compatible With 2005-2019 Tacoma Double Cab


Since buying this Toyota Tacoma, I’ve felt that the sides of the truck looked a bit bare and lacking. The obvious answer was to pick up a pair of sides steps and that’s just what I did. After some research, I decided on the Tyger Auto Star Armor Nerf Bars. The are just about as tough as it gets without going to full blown rock sliders.

For those interested in installing side steps on the 3rd gen. Tacomas, it is extremely straightforward. Under the Tacoma, near the outer edges of the doors, you’ll see what looks like plastic screws. If we take a screwdriver to these, they’ll reveal the pre-tapped threading in the truck’s body which is where the side steps will be attached to. There are 6 of these caps in total to be removed per side.

Once the plastic caps are removed, it’s just a matter of raising the nerf bars up and mounting them with the included hardware. Other nerf bars typically come in two main pieces, the brackets that attach to the truck and the actual bars, which attach to the brackets. These are easier to install because you can install the individual parts one piece at a time. The Tyger Star Armor nerf bars’ parts are all welded together, making one solid structure. This makes them slightly harder to install because it can be difficult to lift and bolt them in place by yourself. You may want to find something to prop them up with or find some help.

Once all 6 bolts are in place, you’re done and all there is to do is repeat on the other side.

I installed the Tyger Star Armor Nerf Bars on my 2019 Toyota Tacoma TRD Sport. According to the manufacturer, these should fit all double cab Tacomas from 2005-2019. They also make an access cab version if that’s what you need.

These Tyger nerf bars feature a rust resistant E-coating textured black finish. This is definitely different from the other options on the market. Typically, it’s a lot of black or chrome with the other options. Although the Star Armor is black, the textured finish helps to differentiate the aesthetic.

At both ends of the bars are sealed end caps to keep dirt and water out. I’m actually a bit disappointed by this. I would’ve preferred to have welded metal end caps. I think that this would’ve been more secure and durable but what do I know. Maybe the plastic caps are the better way to go.

Then, of course, we can’t talk about these nerf bars without talking about the patented laser cut star armor step pad design. I have to be honest, I was holding off on buying these for some time. I knew that they’d work great but the step pad was preventing me from buying them. This is for two reason. One, this pad has no anti slip rubber like other nerf bars. These nerf bars are just pure metal and I have a feeling that on a wet day, they are going to get slippery. My second problem with the step pad is just how it looks. This laser cut design is just so in your face and, in my opinion, a bit gaudy. Had Tyger just went with a solid metal pad or a more simple design, I would’ve bought these in a heartbeat and there are others who feel the same based on some of the reviews that I’ve seen. If you share either of these concerns and still want these nerf bars, then I have the perfect mod for you. I found a product and it is essentially a self-adhesive anti-slip rubber mat. People use these on stairs, tiles, really anywhere that’s slippery. These pads come in various sizes so all we have to do is cut them to shape and stick it on top of the nerf bars and boom, killed two birds with one stone. I would suggest getting the 12” x 12” pad because it is a better value. However, if you want a little less cutting work, buy the 4” variations as this width is perfect for the step pad.

Overall, I would say that these nerf bars look great on the truck. They give you a different look than the other options on the market. They look so mean. Traditional nerf bars just give you a single tube whereas here, we have multiple tubes welded together to create one single structure. Because of their construction, these nerf bars are actually more robust and have a weight capacity of 500 lbs per side. This product is really like a toned down rock slider.

What I really like about these nerf bars and one of my main reason for buying them is the width. Manufacturer specs say that we get 6.44 inches from edge to edge. I was looking for something wider because to me, aside from making the truck look better and allowing you to get in and out easier, nerf bars can provide a form of protection against side impacts. Imagine you’re in a parking lot and someone opens their door, slamming into your car. Just the worst. But with some wider nerf bars, you have a chance of the doors slamming into the bars and away from the finish. These were the widest nerf bars that I could find and they’re looking like they’ll be pretty protective but only time will tell.

And there you have it, the Tyger Star Armor nerf bars for the Toyota Tacoma. A great product that I do not mind recommending.


If you're considering on buying any of the products mentioned, please support my work by using the links below.

Tyger Auto TG-AM2T20048 Star Armor Nerf Bars for Toyota Tacoma 2005-2019 Double Cab https://amzn.to/2Zzwx6N

Tyger Auto TG-AM2T20188 Star Armor Kit for 2005-2019 Toyota Tacoma Access Cab https://amzn.to/2LdPwvZ

17 in. x 4 in. Self-Adhesive Rubber Safety Mat with Tread Surface https://amzn.to/2NHyB6p

12" X 12" Self-Adhesive Rubber Safety Step Mat Non-Slip https://amzn.to/2MMHeNp


Want to support my work?

Consider visiting the shop and buying "Absolutely Nothing"
https://www.HaiHoangTran.com/shop/absolutely-nothing

or

Become a Patron!
https://www.patreon.com/HaiHoangTran

or

PayPal
https://www.PayPal.me/HaiHoangTran

Sirui EPC-10K

Today, I have for you guys an exclusive first look at an upcoming product from Sirui and it is the EPC-10K.

This was sent to me directly from Sirui Europe free of charge for review purposes. I have not been instructed to say anything in particular about it so all opinions expressed will be my own.

The EPC-10K arrived without any packaging and there is no information for it listed anywhere yet because it is not yet for sale. I received a pre-production unit but was told that the one I received is representative of the final product. The EPC-10K is expected to be available starting September 1, 2019 for $149.90. If there are any updates to the product after the official release, I’ll make sure to update the information in this write up.

When I first saw images for the EPC-10K, I said to myself “Wait, this looks really familiar.”

Take a look at the Sirui EP-204S. This is the monopod that I most often use, but just look at its feet. Very familiar right? That’s because the feet of the EPC-10K is of the same design as the one used for the EP-204S and a few other Sirui monopods.

Prior to receiving the EPC-10K, this is something that I’ve already done in the past. When I needed a table top tripod, I just took the legs of my EP-204S and threw a ballhead on it. The EPC-10K just comes with a better fitting ballhead.

Although there are no released specs for the EPC-10K yet, I do have the specs for the individual parts and we can make some very good assumptions.

First, the EP-224ST table top tripod. These legs feature a carbon fiber, one section leg design. The legs span from a minimum height of 210mm/8.27in to a maximum height of 285mm/11.22in. The legs can be utilized at 2 different angles and can be adjusted by releasing the leg lock button. The legs by themselves weigh 0.43kg/0.95lb but can hold a max load of 8kg/17.64lb.

Screen Shot 2019-08-19 at 9.26.42 PM.png

When it comes to features, the EP-224ST is a bit more unique than most table top tripods. Again, these legs were originally intended to be used with a video monopod so we get the various features that that entails. The most interesting thing about these legs are the inclusion of the leveling base. Once the security knob and ball locking knob is released, the upper section of these legs act like the leveling base of a video tripod. You can move the stem and achieve different angles much easier than if you were to adjust the tripod legs. This is very useful for leveling out those horizons. The base can also help you achieve some simple camera movements that may not be as stable if you were to handhold.

Screen Shot 2019-08-19 at 9.23.16 PM.png

Next, we have the Sirui CS-10 ballhead. This head measures in at 88mm/3.5in, weighs 0.22kg/0.49lb and has a max load of 13kg/28.7lb. In terms of features, this is a pretty standard ballhead. It utilizes an arca swiss plate system that is accessible by a locking knob and security pin. The main ball and panning base are held in place with two other locking knobs.

To get the final specs of the EPC-10K, we just combine the specs of the EP-224ST legs and the CS-10 head.

  • Minimum Height - 298mm/11.77in

  • Maximum Height - 373mm/14.72in

  • Weight - 0.65kg/1.44lb

  • Max Load - 8kg/17.64lb


You may have noticed that the max load did not change from that of the EP-224ST. While the CS-10 can hold 13kg/28.7lb, the EP-224ST can only 8kg/17.64lb. With a tripod setup, you have to consider the final product as only as capable as its weakest components. In this case, although the head can hold more weight, the legs are not recommended for such weights. Pushing the head to its limits while using these legs may damage the legs and cause total failure, which may result in damaging your camera gear.

This is where this setup surprises me. Typically, the head will be the weak point of a tripod. The legs can typically hold much more than the head. In either case, this seems like a case of missed opportunity. Either make the legs sturdier so I can take advantage of this head’s full potential or give me a head that is more in line with the legs and maybe drop the price a little. Having the head being able to hold almost twice as much as the legs really doesn’t mean anything unless you want to push the limits.

Overall, I would have to say that as a table/mini tripod, this product does very well. That being said, there are a few things that I don’t like about it.

First, I just don’t like the aesthetics of the tripod. This is essentially Sirui using scrap parts to make something new. Because of this, the head doesn’t exactly fit flawlessly with the legs. Had everything been made for each other, the connection between head and leg would be more streamline and not have excessive ridges or gaps. To me, this looks a bit janky and I don’t like it. But again, it functions as it’s suppose to and it does it very well. Like I said, this is something that I myself have done in the past with the EP-204S legs and my own tripod head, but it’s just not pretty. Also, had everything been made for each other, maybe we would have a product with specifications (max load) that fall in line more so with each other.

My second complaint with this product is just that it’s confusing. I’m not sure why this thing exists. Sure, Sirui had the parts around so might as well throw it together to get another revenue stream but I think that this could’ve been implemented better. Again, these are the legs from a video monopod. The adjustable leveling base is to help video shooters get a leveled composition much faster. However, for photography, there is little use for this because the setup comes with a ballhead. The ballhead is much simpler and faster to use than the base. To me, the only big use for a leveling base during photography is for shooting panoramas. But because this is such a short tripod and if you want to shoot panoramas with it, you’d likely always be getting a ground level parorama. This tripod would primarily only give you one look. A better use for these legs would be for video like it was designed for. I think that Sirui should’ve brought this product out with a small, compact fluid head. That would’ve paired real well with these legs and, sure, a table top fluid head tripod would be a niche product, but I guarantee that there would be a market for it.

Some of you may be reading this and be thinking that this would make a good vlogging tripod. You can attach a camera and use the tripod as a makeshift selfie stick to get a wider shot and the legs allow you to put the camera down. This seems like it would be a good run and run setup but for those interested in doing this, let me point out a few things. First, this is a pretty unergonomic setup for handholding. The way that the legs themselves are orientated make the entire lower section pretty wide so unless you have some pretty big hands, it will be uncomfortable to hold the tripod over time. Another issue with the legs is that they never fold up evenly unless you spend some extra time to really try to achieve this. When you try to collapse the legs together, they’re typically lopsided and this just adds to the unergonomic grip. Again, you can spend the time to adjust this but imagine doing this every time you try to grip the legs. It’s just a lot of wasted time. You can definitely use EPC-10K as a vlogging tripod, but I just really don’t think that it’s optimized for it. Check out Sirui’s 3T-15 or 3T-35K which are two superior vlogging tripod options.

At the end of the day, had Sirui not sent me this item, I honestly would not buy it. That sounds bad but this is simply because I already have the legs from the EP-204S and can just throw my own ballhead on there and make my own version of the EPC-10K, like I have in the past. For those who own a similar monopod with a similar set of legs, I would suggest you do the same. I wouldn’t spend the extra money just to buy this setup for the extra head. However, if you don’t have the legs already and are really considering this option then I would’nt mind recommending it. This is a very stable tripod and although I don’t think that this is the ideal package, the minor features can come in handy sometimes. This is an interesting product and worth checking out.


If you're considering on buying any of the products mentioned, please support my work by using the links below.

Sirui EPC10K https://amzn.to/2LeSW1p

Sirui EP-204S https://amzn.to/2KWdPNw

Sirui 3T-15K https://amzn.to/2Zl20W5

Sirui 3T-35 https://amzn.to/2ZdnkNj


Want to support my work?

Consider visiting the shop and buying "Absolutely Nothing"
https://www.HaiHoangTran.com/shop/absolutely-nothing

or

Become a Patron!
https://www.patreon.com/HaiHoangTran

or

PayPal
https://www.PayPal.me/HaiHoangTran

OVERHYPED | Zhiyun Crane M2

I was recently sent the Zhiyun Crane M2 for review. This is an electronic gimbal meant to help you get more stable footage. This gimbal is smaller and lighter weight so it’s meant to be used with smaller cameras like smartphones, action cameras, point and shoots, and if you’re micro 4/3, APS-C or full frame camera is small and light weigh enough, you can also throw that on the M2. I was actually pretty excited to get this but after essentially my first use, I can tell that there were some issues and annoyances that no one seems to be pointing out. Don’t get me wrong, this thing works and functions as it should but I think it’s overhyped and you should be aware of some things.

ASSASSIN_S005_S001_T049.jpg

First, let’s look at the design. One thing that other reviewers really like to highlight is this gimbal’s ability to lock up so it doesn’t move around during transport. This was something that I was really looking forward to, until seeing how it is implemented in person. At the base of the pan axis is a physical switch to lock this axis in place. This lock works flawlessly.

ASSASSIN_S005_S001_T057+.jpg

Then we get to locking the other axis. Unlike the pan, there is no physical lock anywhere else. The upper section of the gimbal is held in place by a series of cutouts that line up with each other and a pin that holds the camera carriage in place. Storage mode is basically accomplished by utilizing friction and male/female alignments. The problem with this is that over time, the surfaces that require direct contact will get absolutely destroyed. Say goodbye to that nice black finish. Another problem with this is that because you have to go out of your way to take the gimbal out of balance to put it in storage mode, you’ll have to re-balance the gimbal every time that it is utilized.

But wait, another thing about the M2 that is overhyped is the memory lock. This is essentially a stopper that you can set so that when you throw the gimbal out of balance, you can easily move the adjustment point to where the stopper is and know that that is where it should be to have a balanced gimbal. That’s wonderful! It works well, but it’s only available on 1 of the 5 adjustment points. It’s only available on the roll axis. Thank you for making my life easier on the point that’s easiest to adjust and not anywhere else!

ASSASSIN_S005_S001_T053.jpg

Another thing that people seem to be hyping quite a bit is the quick release plate. This can be extremely useful but here, it’s pretty stupid. This isn’t new. Many other gimbals use a quick release plate system but with those, you actually get a functional system. They use plates that are common like the Manfrotto or Arca Swiss style. Here, we get a proprietary plate. This means that you either have to have a camera dedicated to this gimbal or be prepared to switch plates as you move from this gimbal to something else and of course, be prepared to rebalance every time because the camera carriage ajustment point is the same as the screw that holds the camera in place. On the more thought out gimbals, these would be two independent things. Because these two thigns use the same screw, the screw has to be big enough so that people can put enough torque on it to tighten it in place. This makes putting the camera with the plate down on a flat surface impossible. I just think that the entire camera carriage section was poorly thought out.

Finally, from someone who uses a lot of gimbals and makes instructional videos on balancing them, the Zhiyun Crane M2 is probably the hardest gimbal that I’ve ever had to balance. A lot of this has to do with it’s overall size. Because it’s made for smaller cameras, the gimbal and it’s adjustment points are smaller. When I balance this gimbal, it seems like I’m often extending the adjustment points to their max. It seems like with any adjustments, the parts start to hit each other and cause cosmetic damage. For the small size of the gimbal, we give up proper clearance for balancing. This may also be an issue for come cameras as the cameras may bang up against the gimbal during balancing and in use.

Even with these complaints, if you were to ask me if I would recommend the Zhiyun Crane M2, the answer would have to be yes. For the price of this gimbal, it’s going to be hard to find something as feature packed and versatile. This is a great gimbal but some of its features were just overhyped. I received this product for free for review. I would assume that other reviewers who made early reviews also did too. I just wonder if these other reviewers really did not notice these issues/annoyances or they just chose to keep their mouths shut in hopes of getting more free products in the future. Again, this gimbal is recommended but don’t think that it’s the perfect gimbal. Some of the designs could use improvements but this is probably the best that we have right now.


If you're considering on buying any of the products mentioned, please support my work by using the links below.

Zhiyun Crane M2 https://amzn.to/2GRb8LS


Want to support my work?

Consider visiting the shop and buying "Absolutely Nothing"
https://www.HaiHoangTran.com/shop/absolutely-nothing

or

Become a Patron!
https://www.patreon.com/HaiHoangTran

or

PayPal
PayPal.me/HaiHoangTran